often, while working on our laptop or computer, we need to take a screenshot, or we need to take a screenshot of some part on the screen. But due to a lack of correct information, this work can be a waste of time or you have to seek the help of another person.
Keeping this in view, today we will know what are the ways through which we can do the task of taking screenshots in Windows 10 according to our wish. So let’s start this tutorial.
1) Take a screenshot in windows 10 using the snipping tool
Windows 10 already has a powerful tool for taking screenshots, which is known as the snipping tool.
The way to use this tool is as follows –
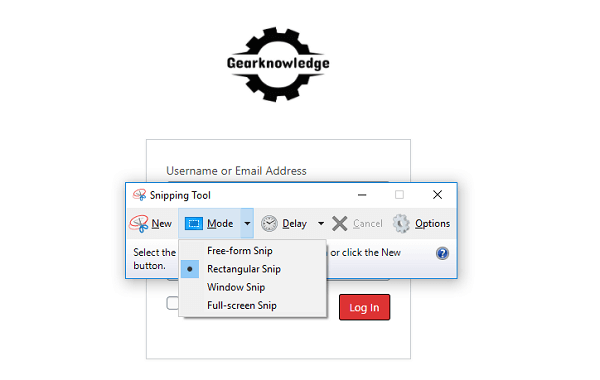
a) Go to the Start menu of Windows 10 and search for the snipping tool.

b) Now you will see the interface of this tool. Now click on the option of Mode and select the type of screenshot you want to take. Here you will see 4 options which range from free form shape to full-screen screenshot, you can choose one of the four options according to your need.
Also Read: Top 5 things you should do with your phone
c) Now you have to click the option of New.

As soon as this happens, the screen will freeze and you have to select the area on the screen with the help of the mouse according to your need.

d) After completing the selection, your selected part will come in a popup where you will get the option to do drawing tools and other types of modifications on this selected screenshot.

You may find this useful: Top 5 Best Cloud Storage for Data Backup
e) Now you can save your image file wherever you want by clicking the save button, not only this, if you want, you can directly paste this image file anywhere using the copy option in the edit menu.
2) Take a screenshot in windows 10 with the help of the keyboard’s print screen button
The keyboard of your laptop or computer has a button called ‘PrtScn’ or ‘PS’ or a similar name. When you click this button, the entire screen gets copied to the clipboard and you can paste the entire data of the screen directly into another application such as Microsoft Word or Paint.
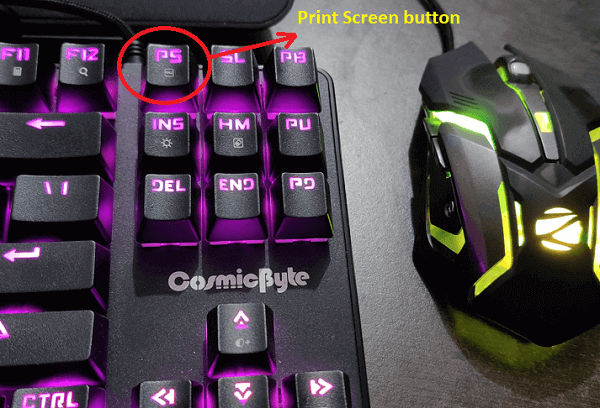
Also, there are some other combinations associated with this button, using which you can take a screenshot according to your need.
a) PrtScn + Alt key combination
With the help of this combination, you can directly copy the data of the active window. No other application or window of the background is copied into it.
b) PrtScn + windows key combination
Pressing these two keys together automatically saves the entire screen as an image file in a folder named “Screenshots” inside the “pictures” folder.
c) Shift + Windows key + S key combination
Under this combination, first, you have to press the Windows key and the shift key simultaneously and then press the “S” key once. After doing this, the entire screen will freeze and now you have to select the required area using the mouse. When you select the area with the mouse and release the mouse, your desired image will be saved in the clipboard, and you can now paste it directly into another application.
Related Useful Tips: Top 8 Whatsapp Settings, You Must know them
3) Take a screenshot in windows 10 through the Game Bar
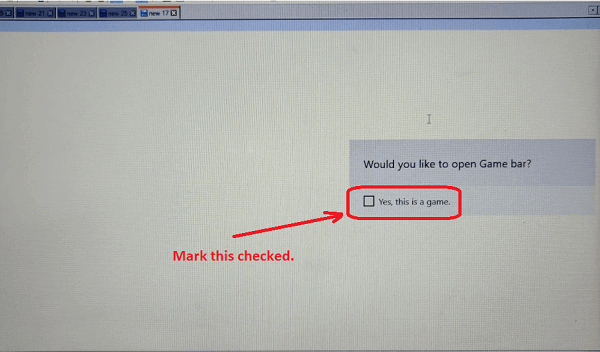
In Windows 10 you can activate the game bar by pressing the window key + “G” key simultaneously. As soon as the game bar appears, you will see the checkbox of “Yes, This is a game” which you have to check. After this, you will not have to check this option for the same applications and the game bar will appear in running condition.
In the game bar, you will see a camera icon for capturing screenshots and a big round button for recording a video (See the screenshot below).

That is, with the help of the game bar you can record the video of the screen, not just the screenshot.
You will find the recorded videos and screenshots in a folder called “Captures” inside the “Videos” folder.
How did you like this tutorial, please tell us by commenting below.






I do agree with all the ideas you have introduced on your post They are very convincing and will definitely work Still the posts are very short for newbies May just you please prolong them a little from subsequent time Thank you for the post